
The class teacher put your name down for the decoration committee. Nobody asked. It was just decided in a staff room you were not in.
Now there is a WhatsApp group called “Diwali Decor” with fourteen members and no plan. Someone suggested buying fairy lights from Amazon. Someone else said their cousin has a shop. And you are sitting there wondering how many days you have and whether anyone owns a pair of scissors.
Diwali usually falls in late October or early November. In 2026 it is on Sunday, 8 November. That leaves a handful of free periods, maybe one Saturday, and whatever the school agrees to let you stay back for.
Some good news. Your classroom does not need to look like a home decor catalogue. It needs to look like students made something. That is a different and much easier brief.
Seven ideas below. All cheap. All doable with a pair of scissors and a glue stick. None of them require a hot glue gun.
Start with What Your School Will Actually Allow
Before you buy anything, check two things. Can you stick things on the wall? Some schools have rules about tape and pins. And can you keep the stuff up till Diwali, or does it come down the same evening?
This sounds boring. But it saves you from spending three days on a toran that gets pulled down by the peon on Friday.
Also, decide who is doing what. Seven people standing around one chart paper is not teamwork. It is an argument with scissors.
Quick Safety Check Before You Start
Scissors and cardboard need adult eyes in the room, especially with younger classes. Use non-toxic glue and paint only. If anyone has skin allergies, keep a pack of gloves. Chalk on the floor gets slippery once it is walked on. Put a small wet floor or rangoli sign, or do the paper version if the corridor is busy. No open flames with the paper and cardboard diyas.
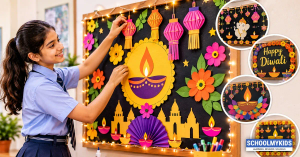
1. Cardboard Diya Wall Display
This one is the easiest to make look decent, and it uses the boxes from the school’s own storeroom.
Take old cardboard cartons. Cut out diya shapes, roughly the size of your palm. They do not have to be identical. Diyas are hand-thrown; they are never identical anyway.
Paint them. Acrylic is best. Poster colour works, but it cracks slightly when it dries. If you have no paint, use coloured paper pasted on top and a sketch pen outline.
Stick them on the wall in a wave or a circle. Add a flame shape above each one in yellow or orange paper.
The thing that goes wrong here. Cutting cardboard with school scissors is a workout. Your hand hurts after four diyas and the fifth one comes out lopsided. That is fine. Lopsided diyas on a wall look handmade. Lopsided diyas are also why you should cut one template from paper first and trace it, rather than free-handing each one.
Pro Tip: If you use Fevicol on painted cardboard, it takes ages to dry and the diya slides down the wall. Use double-sided tape. It holds and it comes off cleanly.
2. Newspaper Toran
This is the craft that looks expensive and costs nothing.
Cut newspaper into long triangles. The wide end should be about three fingers across. Roll from that wide end, using a pencil or a thin brush as your rolling stick. Keep the tension tight as you go. Glue the loose tip down so it stays rolled.
Now you have paper beads. String them on a thread. Alternate with a few beads made from coloured paper so there is some contrast.
What actually happens. The first roll is loose and unrolls by the evening. Roll tighter. And glue the tip, then hold it for ten seconds while the glue grabs. If it still unrolls, wrap a small piece of cellophane tape around the middle.
Also. If you thread through the rolled paper directly, the hole is messy. Thread through the middle of the roll where the layers overlap. That is where it is thickest and least likely to tear.
3. Chart Paper Kandil
The classic hanging lantern. Chart paper, scissors, glue, thread.
Fold the chart paper in half the long way. From the folded spine, cut slits that stop about two fingers before the open edge. The spine stays intact. That is what holds the lantern together. Unfold it, curve it into a cylinder, and stick the two ends together. The cuts will splay out into that lantern shape.
Add a thread handle at the top and a paper tassel at the bottom.
The mistake everyone makes the first time. Cutting all the way to the edge. Then the paper falls apart into strips and you have to start again. Mark the stopping line with a pencil and a ruler before you cut, and cut to the line, not past it.
Second mistake. Using thin chart paper. It flops. Use card stock or two chart papers stuck together.
4. Paper Lotus Flowers
Start with a paper circle. Cut eight slits from the edge inward, stopping before you reach the middle. The centre stays whole, roughly the size of a one-rupee coin.
Now fold each petal slightly upwards and stick the tip to the petal next to it. Do this for two or three layers, each layer slightly smaller than the one below.
Stick them on the wall, or tie them to a string.
The realistic problem. Your petals will be uneven sizes. Unless you trace from a template, they always are. Trace one petal shape on a scrap of paper first, then use it as a guide for all eight. If you are making twenty flowers, make one template. It takes two minutes and saves an hour.
5. Chalk Rangoli at the Classroom Door
Traditional rangoli in most Indian homes is made at the doorway, on the floor. It is one of the oldest parts of the festival, and it does not need any material beyond powder or chalk.
For a classroom, use coloured chalk on the floor near the door. Start with dots in a grid, then join them into a pattern. Or draw a circle and build outward.
Do this last. Chalk smudges. If you draw it in the morning, by afternoon it will be a grey smear and thirty shoes will have walked through it. Do it an hour before you leave on the day before the holiday.
Also. If the school will not allow floor drawing, do the same design on a large sheet of paper or on brown packing paper. It does not smudge and it survives.
6. Ice Cream Stick Wall Hanging
Collect ice cream sticks. If nobody has been collecting them, the craft shop sells a pack for very little. Or ask the canteen.
Stick them into shapes. A star. A flower. A simple sunburst. Glue the joints and let them dry fully before you pick them up. Paint them. Tie a thread.
What goes wrong. You pick it up too early and the whole thing collapses. Ice cream stick crafts need drying time, and in a humid classroom that is longer than you think. Make them in the first half of the session. Do the stringing at the end.
Also. White glue on smooth sticks slides. Rough the surface slightly with the edge of a scissor blade before gluing. It grips better.
7. Old Greeting Card Bunting
Schools are full of old greeting cards. Ask the office. Ask teachers. They have a drawer of them.
Cut each card into two triangles. Punch a hole in the two corners of the wide end. Run a string through the holes and hang it across the room, corner to corner.
A quick fix for a common problem. Paper tears at the punched hole when the bunting is pulled tight. Stick a small piece of tape on both sides of the hole before punching through it. Or punch slightly away from the very corner.
You can also write a word on the triangles, one letter each. “HAPPY DIWALI” uses eleven triangles. Mix the card designs so it does not look like a photocopy.
A Few Things That Will Go Wrong (and What to Do)
Somebody’s craft looks better than everyone else’s. Someone in every group is quietly good at this. Do not turn it into a competition. Put them on quality control. Their job is to fix the crooked ones, not to make the rest feel bad.
You run out of glue on day two. Glue sticks run out fast with fourteen people. Buy two or three extra. And keep the wet glue separate. Wet glue is for the strong joints; the glue stick is for paper.
Nothing matches the picture you saw online. Nothing ever does. The reference images you saw were made by adults with better paper. Your classroom will look like students made it. That is the point.
The tape gives up overnight. Cheap masking tape does not stick to painted walls. Use double-sided foam tape for anything heavy. Do a small test on one corner the day before you put everything up.
Someone’s piece tears. It will. Keep a roll of cellophane tape in the box. A tear at the edge can be taped from behind and nobody notices from a distance. A tear in the middle of a flower petal, you redo the petal.
The Material List You Can Screenshot
Save it or print it. Give it to whoever is going to the shop.
Item | Rough quantity | Notes |
Chart paper (assorted colours) | 10 to 12 sheets | Get two thicker ones for the kandils |
Old cardboard cartons | 3 or 4 | Ask the school storeroom first |
Old newspapers | A stack | Toran material, free |
Coloured paper (A4 or smaller) | 2 packs | Cheaper by the pack than by the sheet |
Glue sticks | 4 | They run out faster than you think |
White glue (Fevicol) | 1 bottle | For strong joints only |
Scissors | At least 6 pairs | More than you think. Always more |
Double-sided tape | 2 rolls | For sticking to walls |
Cellophane tape | 2 rolls | Also for torn edges |
Thread or thin string | 1 roll | White or gold |
Sketch pens or markers | A few, assorted | Black and orange go first |
Acrylic or poster paint | 2 or 3 colours | Acrylic if you can, it does not crack |
Coloured chalk | 1 box | For the rangoli |
Ice cream sticks | 1 pack | Craft shop or canteen |
Old greeting cards | Whatever you can find | Free from the school office |
A4 paper | For templates | Trace once, cut many |
Two things missing from most lists: a couple of old newspapers to spread under the painting, and a waste bag. Paint on the floor does not come off easily.
Also keep a small first-aid box or at least plasters in the craft box. Cardboard edges and scissors occasionally nick fingers.
Conclusion
Nobody is judging the classroom against a video. People will walk in, see colour, see something that clearly took effort, and that is it.
Start with the diyas. They are the fastest to show results, and once there are diyas on the wall, the group stops arguing about whether the whole thing is going to work.






Be the first one to comment on this story.