Bookmarks are more than just placeholders in a book — they are small expressions of personality, creativity, and love for reading. Whether you are a student, an avid reader, or someone who simply appreciates handcrafted items, creating a beautifully decorated bookmark is a fulfilling activity. It blends the joy of craft with the world of literature and gives you a stylish way to mark your page.
In this article, we explore the process of creating unique bookmarks, design inspirations, materials required, and how they can even become thoughtful gifts.
Why Make Your Own Bookmark?
- Personal Expression: A handmade bookmark reflects your interests — be it your favorite color, book, quote, or design.
- Cost-Effective: Using easily available materials like cardstock, ribbons, buttons, or scrap fabric saves money and encourages sustainable reuse.
- Great for Gifting: A personalized bookmark makes a charming gift for teachers, friends, or fellow readers.
- Perfect for All Ages: From school projects to book club crafts, this activity is enjoyable for kids, teens, and adults alike.
Materials You’ll Need
Creating a bookmark doesn't require expensive supplies. Here’s a list of basic materials:
- Thick paper or cardstock
- Scissors
- Glue stick or adhesive tape
- Markers, pens, or colored pencils
- Ribbons, lace, or twine (optional)
- Decorative items: stickers, washi tape, sequins, pressed flowers
- Hole punch (optional)
- Laminating sheets or clear tape (optional for durability)
Step-by-Step Guide to Making a Beautiful Bookmark
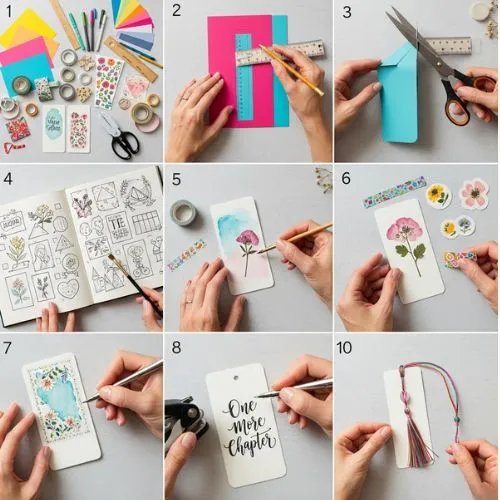
Step 1: Choose a Base
Start with a piece of cardstock or sturdy paper. Standard size for a bookmark is approximately 2 inches by 6 inches, but you can adjust based on preference.
Step 2: Select a Theme or Style
Decide what kind of bookmark you want to create. Options include:
- Literary Quote Bookmark: Use a favorite quote from a book or author.
- Nature-Inspired: Use dried leaves, pressed flowers, or nature doodles.
- Minimalist Design: Clean lines, pastel colors, and simple shapes.
- Whimsical or Illustrated: Use drawings, cartoons, or watercolor backgrounds.
Step 3: Decorate the Surface
Use colored pens, paints, or collage materials to decorate the bookmark. This is where creativity shines:
- Draw patterns or mini illustrations.
- Use washi tape to create borders or stripes.
- Add stickers or cutouts related to books, animals, or hobbies.
Step 4: Add Text (Optional)
Write a quote, your name, or a phrase like “Books are magic” or “Shh... I’m reading!” in decorative lettering.
Step 5: Punch a Hole & Add a Tassel
Using a hole punch, make a hole at the top of the bookmark. Thread a ribbon or twine through it and tie a knot for a decorative tassel. You can even use old bracelet charms or beads for flair.
Step 6: Laminate (Optional)
For added durability, laminate the bookmark using a laminating machine or wrap it in clear packing tape. Trim the edges to clean up the finish.
Creative Bookmark Design Ideas
| Theme | Description |
| Vintage | Use sepia-toned paper, cursive fonts, and old stamps. |
| Botanical | Include leaf stamps, floral patterns, or green shades. |
| Modern Abstract | Use geometric shapes and bold colors. |
| Character-Based | Create bookmarks inspired by favorite fictional characters. |
| Interactive | Make a corner bookmark or one with a flap to hold notes. |
Tips for Beginners
- Always use clean, sharp scissors for precise cuts.
- If using glue, allow it to dry completely before handling.
- Test markers and pens on scrap paper before using them on the final bookmark.
- Practice calligraphy or lettering on a separate paper first.
Conclusion
Creating a beautifully decorated bookmark is not just a craft — it’s a personal celebration of the written word. Whether you’re reading a classic novel, a thrilling mystery, or a school textbook, your handmade bookmark will accompany you with style. So gather your supplies, unleash your imagination, and let your bookmark tell its own little story.


Be the first one to comment on this story.