Introduction
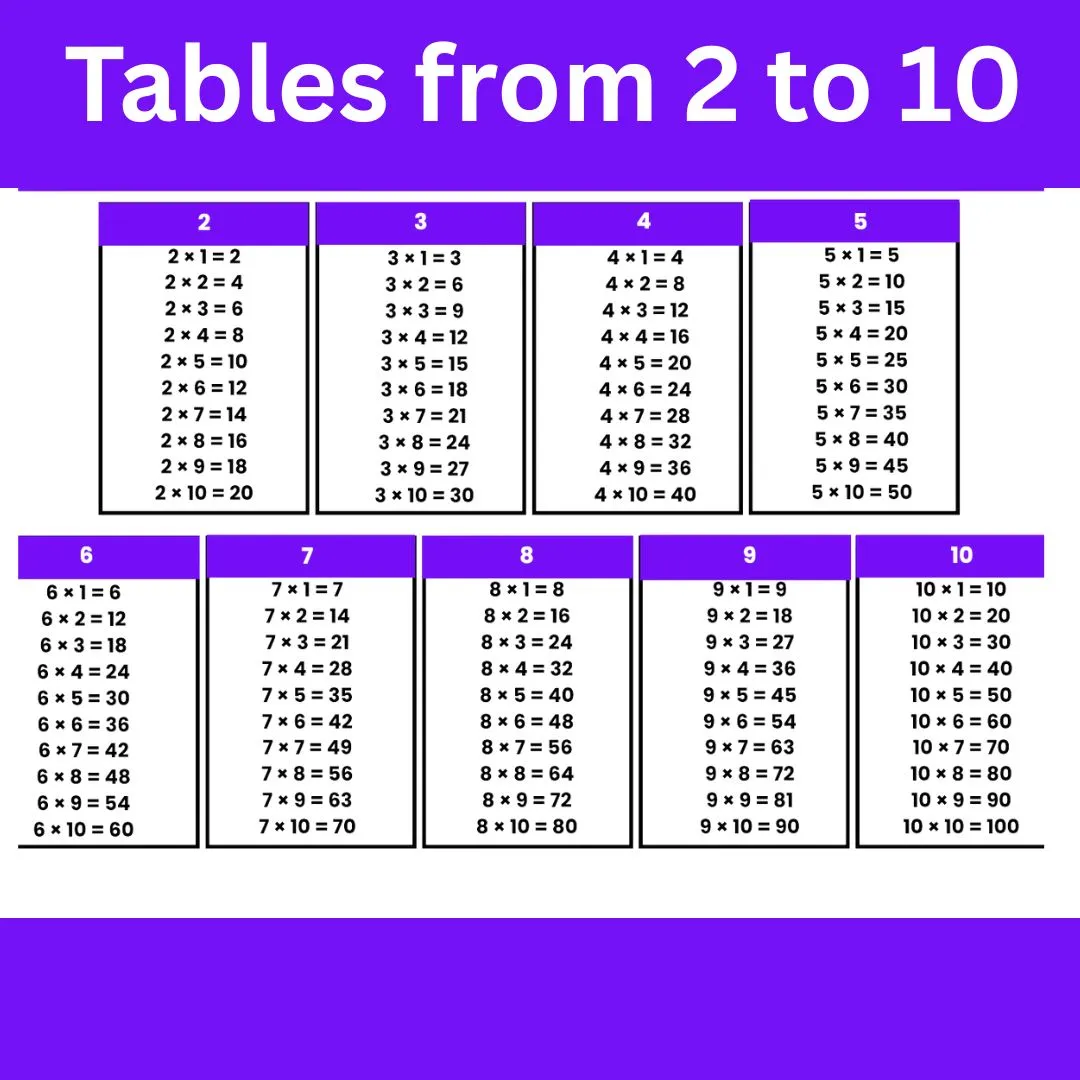
Learning multiplication tables is an essential part of early mathematics education. But rote memorization can be dull for many children. Turning this process into a creative art project on chart paper can make it enjoyable, colorful, and highly effective. When students visualize and design their own multiplication charts, they not only memorize better but also take ownership of their learning.
Objective of the Activity
To help students from primary classes (usually Grades 2 to 5) learn multiplication tables from 2 to 10 through a hands-on, creative chart-making activity.
Skills Developed
- Understanding multiplication as repeated addition
- Enhancing memory through visual association
- Strengthening design, layout, and artistic skills
- Improving number sequencing and logical thinking
- Building confidence in math through self-made learning tools
Materials Required
- A3 or chart paper (colored or plain)
- Sketch pens, crayons, color pencils, or markers
- Ruler and pencil for neat lines
- Stickers, glitter, and decorative tape (optional)
- Number stencils (optional, for younger children)
Steps to Create the Multiplication Tables Chart
Step 1: Decide the Layout
Choose how you want to present the tables. Popular layout styles include:
- Column layout (Each table in a vertical column, from 2 to 10)
- Grid layout (Rows and columns forming a multiplication matrix)
- Theme-based layout (Each table inside a shape: trees, clouds, rockets, etc.)
Step 2: Plan the Headings and Design
- Title your chart clearly at the top: "Multiplication Tables from 2 to 10"
- Use bold and large headings for each multiplication table
- Decide a color scheme — perhaps a different color for each number
Step 3: Write Each Table
For each number from 2 to 10, write the full table like this:
2 × 1 = 2 , 2 × 2 = 4, 2 × 3 = 6 ... 2 × 10 = 20
Repeat for 3, 4... up to 10.
Tips:
- Use boxes, borders, or bubbles around each table
- Maintain spacing and alignment using a ruler
Step 4: Add Creative Elements
- Draw relevant illustrations (e.g., 2 apples × 3 = 6 apples)
- Use math symbols decoratively (×, =)
- Include fun facts (e.g., “Did you know? 5 × anything ends in 0 or 5!”)
- Make the zero table or skip-counting ladders as a bonus section
Step 5: Final Touches
- Outline numbers with sketch pens for better visibility
- Use glitter or stickers for borders or emphasis
- Ensure all spellings and numbers are correct
- Sign your name at the bottom as the creator!
Creative Theme Ideas
| Theme | Design Tip |
| Garden Theme | Each table inside a flower or tree |
| Space Theme | Tables inside rockets, stars, or planets |
| Underwater World | Tables in fish bubbles or inside sea creatures |
| Rainbow Theme | Each table written in a different rainbow color arc |
| Jungle Theme | Tables inside animal footprints or leaves |
Educational Benefits
This project blends art with arithmetic, encouraging:
- Active engagement with numbers
- Repetition through writing and design
- Pattern recognition (e.g., even numbers, multiples of 5)
- Visual memory aids through colors and shapes
It also supports kinaesthetic learners — students who learn best through hands-on activities.
Where to Use the Chart
- As a wall poster in your study space or classroom
- As part of a math fair or learning exhibition
- During homework or self-practice sessions
- For peer teaching — students teaching their friends using their chart
Conclusion
Creating a multiplication tables chart from 2 to 10 is more than just a math task — it’s a creative learning journey. When students decorate, design, and structure their own charts, they engage with multiplication deeply and joyfully. This fusion of art and arithmetic not only makes learning fun but ensures better retention.
Encourage every child to proudly display their chart — because every equation they write is a step toward mathematical confidence.







Be the first one to comment on this story.